7/25/13

Knock, Knock

Colored Eggs....The game goes: 

Wolf: "Knock, Knock" 
Kids: "Whose There?" 
W:" The big bad wolf." 
K: "What do you want?" 
W: "Colored Eggs" 
K: "What color?" 

 At the start of the game, the mother hen whispers a different color to each child. If the wolf picks their color they have to run to a certain distance and make it back home safe, if not, they are "eaten" by the wolf. 

 My mom made up the game and it has been a classic in our household ever since. 

 It's the favorite game of the week. 

 Avila designated herself as the wolf last night.

I do dress my children. Recently, they have been requesting to go shirtless. Who knows why; Avila always takes it to the next level.

7/23/13

Growing Things

Every night we check the garden...


We check to see what is growing, which plants need more water, which ones are ready to be picked. Yesterday, I made glutten free zucchini bread with them, and they were so proud that the zucchini's came from our garden.


 Christiana by far is our most faithful gardener. I'll never forget her big wide eyes and beaming smile as she sprinting into the house to tell me the watermellon had grown.


Andrew does such a good job showing them each different plant, and explaining when to know it's ready to be picked.

One of our zuchinni plants just never took off or did well as the other two and wilted over the weekend. Odd, it recieved the same exact care as the other plants. It's the egnima of gardening.


Our other things growing....
Sometimes Andrew and I take a mental snapshot of the moment we are in right now, it helps us to make sure we are aware of the moment in relation to time and appreciate life right now.


They are in the prime of their childhood, consciences forming, personalities blossoming, and their little bodies growing.


Playing the classic game of Colored Eggs, their current favorite outside game.

I've come to see a little clearer, all the biblical ananlogies of planting and sowing by actually growing a garden and raising children.

Six years ago we started both, and neither of us had done either before.


Sometimes, I lay in bed at night and briefly panic and wonder if I loved them enough, spent enough time with each them, prayed enough for them. I'm sure every mother experiences the same in different degrees.

I realize some of those fears are natural and out of proportion, especially before I sleep, but some, come from understanding the serious responsibility I have as a parent to form their hearts and help them to love God and reach Heaven.


They truly are our treasures and like our garden, require daily, so much delicate love and attention. 


I know we will fail sometimes, I know that down the road, much will be out of my control and they may choose differently even though grown and raised in the same "garden".


On a practical level, Andrew and I both strongly agree that investing time with each other and with our children is a big part of the way we love them.

Even more so, TIME, I believe, is most valued by our children, then any gifts or trips, or toys we could give them.

Along with many hugs and kisses and I love you's, I think they feel and recognize our time with them now, and maybe our acts of service they will come to see later.

Not just being in their precence, and having them playing around us, but playing and BEING with them. This usually involve lots of games, chasing, reading, and telling stories at night.

Andrew has several games that involve him laying on the ground: Circus, Crab, Vibrator, Bridge....games that his Dad played with him when he was little. There is usually high degrees of tickling and laughter involved.

 But all in all, I'm so honored and humbled, sometimes overwhelmed, but mostly grateful to have this responsibility to raise these souls for Heaven. And so I will keep trying, praying, tending, teaching....

"The greatest weatlth a man may acquire is the wisdom from living. And sometimes from small beginnings come the forces that shape our whole lives."
- Jeremiah Kinkaid, So Dear To My Heart

Gluten Sugar Free Zucchini Bread


Gluten Free, Sugar Free Zucchini Bread...to most people may sound like Taste Free Cardboard Zucchini Bread. 

But.... I assure you, it is very very good. I did a taste test on the kids and they loved it.

They were very entertained pealing and shredding during the baking process.
 
Gluten and Sugar Free Zucchini Bread Recipe:

2 1/2 Cups Gluten Free Baking Flour
1 1/4 tsp. Baking Powder
1 1/4 tsp. Baking Soda
1 tsp.Salt
1 Tbs. Cinnamon
1 1/2 Cups Raw Honey
2 Cups Shredded Zucchini
3 Eggs
3/4 Cup Coconut Oil
1 Tsp. Vanilla

Optional Ingredients:
1 Cup of Walnuts or Sunflower Seeds
Chocolate Chips (obviously not sugar free ;)

To Make:
- Preheat oven to 350. Spray 2 bread loaf pans with cooking oil and dust with flour.

- Beat eggs and honey until well blended. Gradually add in oil and vanilla. In a separate bowl, whisk flour, baking powder, soda, salt and cinnamon.

-Alternately stir in flour and shredded zucchini into egg mixture.

- Fold in walnuts if you are using.

- Divide batter evenly between two bread pans.

- Bake for 50 minutes or until toothpick comes out clean from center of bread.


It was delicious, especially served warm and with some butter ;)


Backyard Campout Invites

Over the weekend, we surprised the kids with invitations to campout in our backyard with our tent.

It wouldn't be complete without a bonfire for making smores and telling stories. They couldn't be more excited.


They each got their own personal invites...


To be continued...

7/17/13

Summer Pie: Strawberry Rhubarb

Strawberry Rhubarb Summer Pie


Strawberry Rhubarb Pie
rhubarb2
 
Let me just say, there is something spectacular when you bake a pie. Making a Strawberry Rhubarb pie makes for some summer magic. I never heard of it until I moved to Kansas and it is a local favorite here.Making a pie may sound scary to most people. It was for me. I have many a pie story, but going to Iowa for a Pie Baking class helped change my perspective.Let me put you at ease and tell you it isn’t so bad, and the more I practice, the easier and more enjoyable the experience becomes.Here’s my trick…I make the crust months or weeks or days before I know I’m going to actually make the pie. It takes the pressure off and cuts the time in half.
Or if your blood pressure rises just thinking about making a pie crust, then skip making it all together and buy a ready made pie dough and make the rest.Then when you get really comfortable and are up for a challenge, you can take the training wheels off and I dare you someday to try make a pie from scratch :) .
Trust me, it’s a huge sense of accomplishment, I’m pretty sure I get endorphins from doing it ;) …but then again, I have a weird passion for food.
 
 
The Pie Dough
If you want to try crust from scratch, READ HERE, you will use one ball of dough from Country Pie Crust Recipe
Or 1 Ready Made Pie Dough (for top and bottom shell)
 
 
Strawberry Rhubarb Pie Recipe:
3 Cups of Strawberries (sliced and quartered)
3 Cups of Rhubarb (chopped into 1/2 inch pieces) Rhubarb can be found in the produce section of your grocery store, it kind of looks like red celery.
2 Cups Sugar
2/3 Cup of Flour
1 Tbs. Butter
 
 
Directions:
- Preheat your oven to 425 degrees.
- Toss the chopped strawberries and rhubarb with the flour and sugar.
- Place bottom pie crust in a 9 inch pie plate. I usually poke the bottom crust with a fork 3 or 4 times.
- Spoon fruit into pie evenly distributing it and dot with butter pieces.
- Cover pie with top crust and slit with a knife for ventilation a few times. Tuck the top layer of crust OVER and UNDER the bottom layer and pinch around to seal. (I take my right thumb to the edge of the dough and pinch with my left fore finger and thumb the dough around my right thumb.)
- Optional: Brush pie with Egg Wash (wisk 1 egg with 2 Tbs. Milk) to make the crust shine.
- Foil the edges of the pie so the crust doesn’t burn (removing during last 15 minutes of baking) and place in oven on bottom rack.
- Bake pie for 60 minutes, or until crust is golden brown and juice begins to bubble through the slits in the crust.
Let pie cool completely, about 2 hours, before serving.
 
Extra Notes:
- Usually my crust doesn’t look picture perfect by any means and sometimes my crust looks lopsided, but I remind myself it’s HOMEMADE! I say a “rustic” looking pie looks more authentic anyway ;)
- For Christmas, I received of these oven liners and it totally saves my oven and house from leaking pie burning muck.
- In my oven, I usually bake about 10 minutes extra so the crust isn’t doughy, each oven is different.
Voila!
 
I confess I don’t make pie all the time, but I do love making it for special occasions, or when family comes to visit and it always makes the moment that much sweeter!
Enjoy!


Food Philosophy: Because the effort to make good food is a gift to those around me.
It’s happy memories, togetherness, the living part of life.

7/15/13

Perfect Pie Crust: 10 Steps

I used to have anxiety about making pie crust. Most likely because I had know idea what I was really doing, yet wanted big perfect results.

I learn best when someone shows me HOW TO and I do it with my own hands. My own fears were conquered after taking a
pie baking class in Iowa at the American Gothic house with my sister-in-law, Lindsay.

So I would love to share with you

Phase II
Perfect Pie Crust: 10 Steps
You will need large cutting board or counter top, rolling pin, 9 inch pie glass pie plate.

After the dough has chilled. Take one ball to start your pie crusts. Preheat your oven to 425 degrees, making sure racks are on the bottom.

Step 2 Flour Everything
On a large flat counter top or cutting board, generously coat surface with flour. Do the same with your rolling pin.


Step 3 Dough Discs
Separate the ball of dough into two. Form each separated dough half into a small compact disc. It will make a better circle when you start rolling the crust out.


Step 4. Forming The Circle

Place the dough disc onto the floured surface and with your rolling pin roll north and south, and east and west, like a cross. Keep rolling outward around the circle to form a larger circle that is about 2 inches wider than your pie plate. I usually place the glass pie plate on top of the dough to judge.


Side note: When I first made pie crusts, I didn't flour enough nor did I roll my dough out thin enough. My dough barely hit the top edge of the pie plate once I tried putting it in. Notice how thin the dough is rolled out in this picture. These pictures our from my Iowa Pie Class Adventure with the famous pie lady, Beth Howard.

Step 5. Pick Up
My mom always taught me to fold the dough in half and then in half again. Pick up the folded crust and place in pie plate and gently unfold.  The dough should hang over the pie plate. Gently press down around the bottom so that the crust is fully lining the whole plate.
Or you could pick up this way...


Step 6: Repeat

Repeat Steps 3-5 to make the top crust, making about 3 slits in the center of the pie crust for ventilation. Fill pie with fruit filling and place top crust over the filled pie.


Step 7: Tuck In
Gently tuck the top crust OVER and UNDER the bottom layer of crust. (The dough will be thickest at this outer rim.) Pinch around to seal. (I take my right thumb to the edge of the dough and pinch with my left fore finger and thumb the dough around my right thumb.) Follow around the whole pie.


Step 8: Egg Wash
Brush pie with Egg Wash (whisk 1 egg with 2 Tbs. Milk) to make the crust shine.

Step 9: Foil
Take large strips of foil, almost covering the whole pie, and peel back so that the edges are covered, but the the top of the pie exposed, removing the foil edges during last 15 minutes of baking)


Step 10 Baking the Pie
Place pie in oven on a bottom rack. Bake pie for 60 minutes, or until crust is golden brown and juice begins to bubble through the slits in the crust.

Let pie cool completely, about 2 hours, before serving.


Side notes:
- I usually turn my oven down to about 400 degrees about half way in or once the color is golden and bake an additional 10 minutes to ensure the dough isn't too doughy.

- Usually, I don't make my pie crust and pie on the same day. That's always a recipe for disaster for me, too much pressure. I usually freeze my dough and when the opportunity arises for a pie, the dough is already done so the pie making is less daunting and more enjoyable.

- The more I practice, and the more pies I make, the more comfortable and easy this process becomes. So don't get discouraged!

Strawberry Rhubarb Pie


The world needs more pie :) Happy Baking!


Country Pie Crust


I want to share with you this recipe my mother-in-law gave me from her mother-in-law...you follow?

Back then, those women definitely knew a thing or two about baking pies, it was like doing a load of laundry to them or something of that second nature.


This recipe makes enough for TWO complete pies. (Two top and bottom layers).

Phase 1
Making the Dough

Step 1
Roll up your sleeves, take off your rings, and put on your apron! The dough is sticky, flour flies, and pie crusts need love. So get ready.

Step 2  Gather Ingredients

Country Pie Crust Recipe
4 Cups of Flour
1 1/2 Tsp. Salt
1 3/4 Cups of Shortening
1 Tbs. Sugar

1 egg
1 Tbs. Apple Cider Vinegar
1/2 Cup very cold Water

Step 3 Mix Dry Ingredients
In a large bowl, whisk flour salt and sugar. With a spatula, mix in the shortening, just until it is well incorporated. There will be some lumps larger than others, but do not over mix. Should look somewhat like this....


Step 4 "The Well"

Make a well with the mixture. (I'm not sure why or what the scientific reasoning is behind the "well", but that's what my directions say, so I just follow) Add the egg, cider and water. Mix together until it starts to form into a ball.


Step 5 Ball It

Use your hands to gather up all the remaining flour and gently gather dough all together. Again, it doesn't take much, you don't want to over kneed the dough. Less is more.


Step 6: Chill or Freeze

Separate dough into 2 balls. Wrap in plastic saran wrap and chill in your refrigerate for at least 30 minutes. At this point you can:

a) After 30 minutes, proceed to make you pie.
b) Leave dough up to 2 days in the fridge, make the pie sometime in between.
c) Freeze the pie dough for later use. (This is usually what I do.)


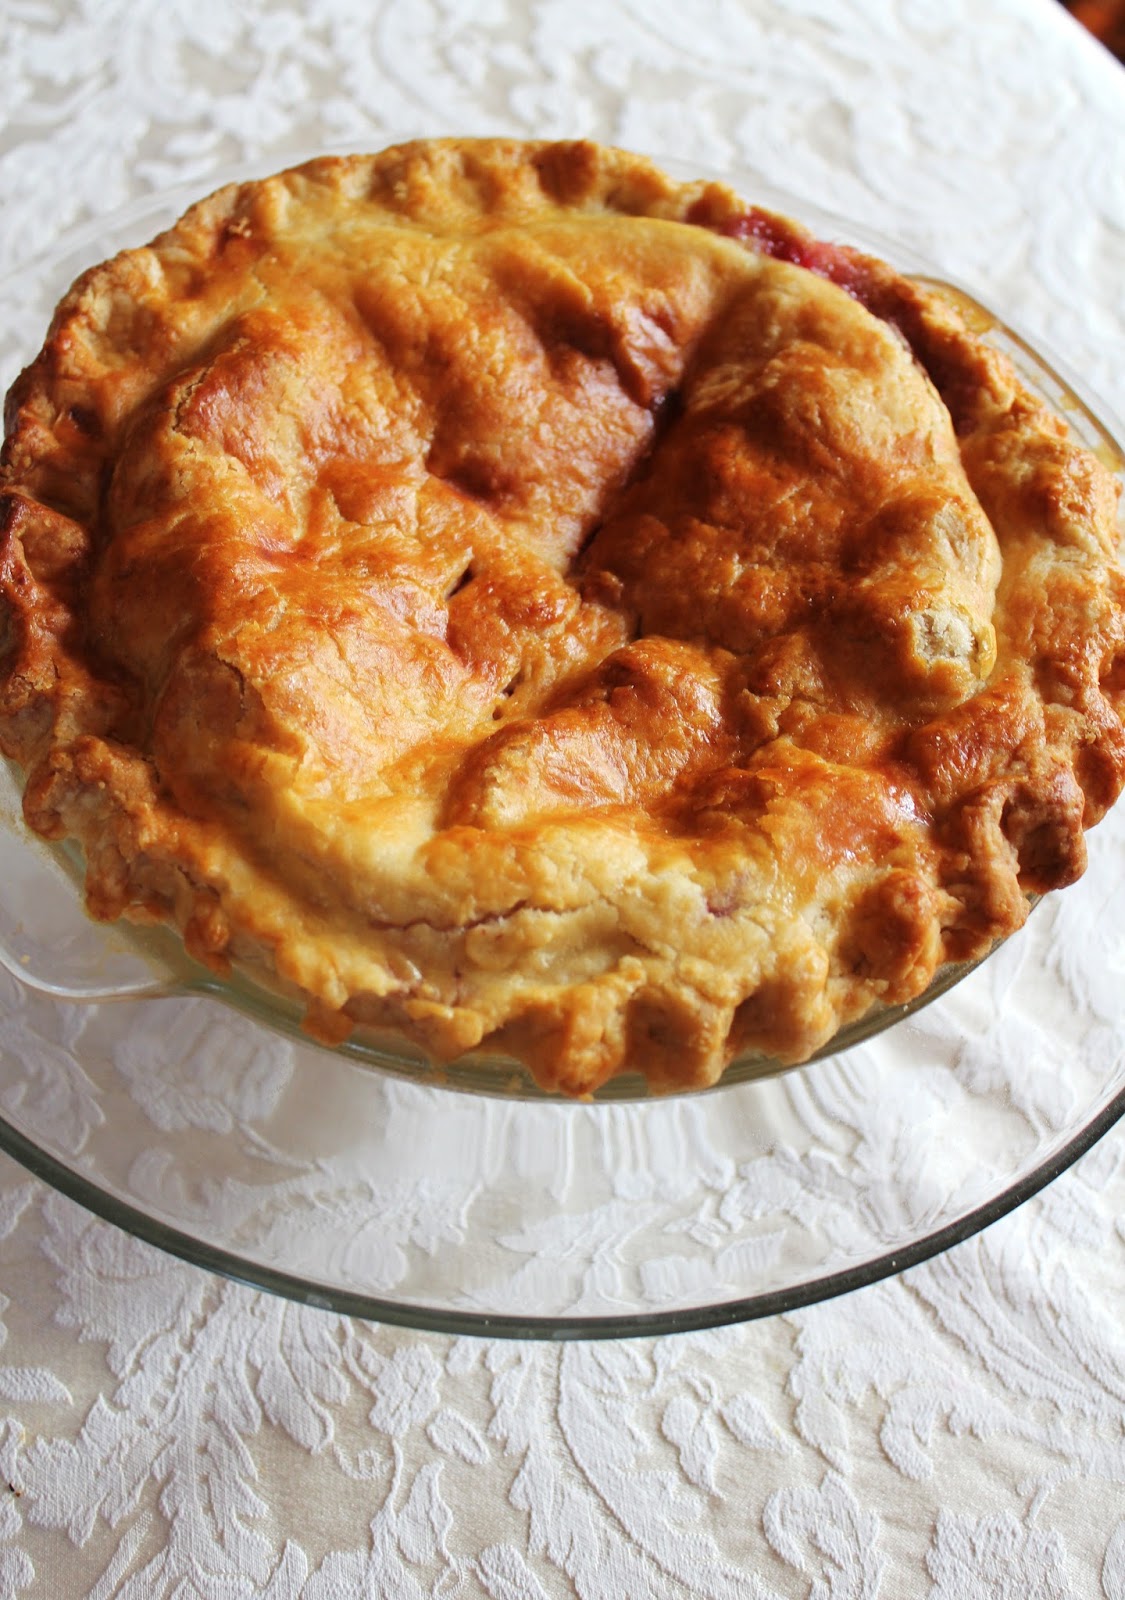
To continue your pie, refer to Perfect Pie Crust:10 Steps 

Food Philosophy: Because the effort to make good food is a gift to those around me.
It’s happy memories, togetherness, the living part of life.